|
The
Sundial Primer created by Carl Sabanski |
|
|
The
Sundial Primer created by Carl Sabanski |
|
| The Sundial Primer Index |
|
DeltaCad Sundial Macros - Valentin Hristov - More Sundials Valentin has written a couple of sundial macros that need you to put the finishing touches on them. There isn't a lot of work involved so don't be worried. Sundial with Parallel Gnomon - sdarbpar This sundial is generated after the user enters the "Latitude", "Longitude" and "Central meridian" of the sundial's location as shown in Figure 1. A "Place" descriptor can also be included. Hour lines intervals of 15 and 30 minutes and one hour are available. The hour lines can be adjusted for longitude and the Equation of Time. The entries for the declination, inclination and rotation of the box give the macro a great deal of flexibility. The sundial can be designed for any orientation. This is not a box sundial and the use of the word "plate" or something similar would be more accurate.
Figure 1 - Sundial with Parallel Gnomon Macro The sundial drawn with this macro is shown in Figure 2. This example is a horizontal sundial. The gnomon for this sundial is parallel to the plane of the dial plate. By folding the two triangles perpendicular to the dial plate the gnomon height is established. A taut string between the top of the two triangles would serve as the style. The direction of the gnomon here is N-S (declination 0). Depending on the position of the sundial plate, as in this case, it is often needed to extend the parallel gnomon out of the printed field. Here it has to be extended down because for latitude 50º the noon altitude of the sun in December is (90 - 50) - 23.5 = 16.5º. The extension down should be at least a distance equal to 3.38 (cot 16.5º ) times the distance between the dial plate and the gnomon. In fact, the extension has to be longer (5.25 times) for all existing hours because the calculation was made only for local noon. Valentin improved his macro by adding a new layer "ShadowCastingPoints" on which only the points on the gnomon casting a shadow inside the rectangular area with hour lines are indicated. When you run the macro, you will see these points and you can use the mouse to view and compare their coordinates. This allows you to determine the exact value of the extension factor using the fact that the distance between the gnomon and the plate is one. Do not forget to switch off this layer before printing. If the full gnomon extension is not used during construction you will have to extend, visually or with a ruler, the existing shadow to the date line. A rectangular gnomon with this height could also be centred on the vertical line. There are now two styles formed by the two edges of the gnomon. The gnomon would also cover some of the hour lines and the sundial would not function correctly. This can be resolved by cutting the dial plate along the vertical line and aligning the two halves with the edges of the rectangular gnomon.
 Figure 2 - Sundial with Parallel Gnomon Try modifying the drawing to incorporate the rectangular gnomon. The best shape of the hour lines for easy reading appears if the gnomon (and the plate) is parallel to the celestial N-S direction as in the box dial discussed on the main page. You can use this macro if you want to make a sundial on a wall outside of your house or inside a room with the edge of the roof or some of the edges of a window as a gnomon. The best orientation would be an East or West facing wall with a non-horizontal edge of the roof close to celestial N-S. The worst position is an E-W edge (parallel to the equatorial plane) when all the hour lines intersect at two common points at the equinoxes, making such a sundial completely unusable. Check this out by entering the following inputs: Decl = 0, Incl = 90, Rot = 90 or -90. Polar Cross Sundial - sdcross This polar sundial is generated after the user enters the "Longitude" and "Central meridian" of the sundial's location as shown in Figure 3. A "Place" descriptor can also be included. The hour lines are automatically corrected for the Equation of Time. Longitude correction can be removed by entering the same value for "Longitude" and "Central meridian".
Figure 3 - Polar Cross Sundial Macro The sundial drawn with this macro is shown in Figure 4 . The sundial is designed to be assembled without glue. Parts of the fifth pattern must be removed as they are not required. No hour numbers are applied as the sundial can be positioned in more than one way.
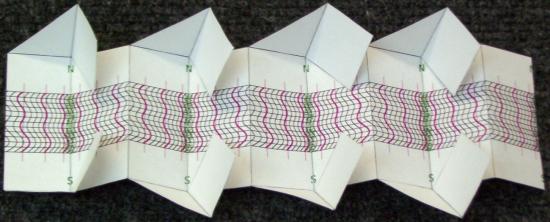
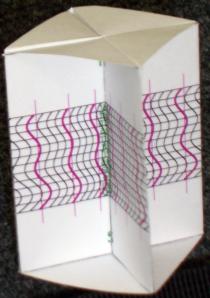
Figure 4 - Polar Cross Sundial This sundial macro is not fully developed. Figure 5 shows how the model is to be cut and folded.
Figure 5 - Cut out the model and fold carefully. Figure 6 shows the completed polar cross sundial. This is a polar sundial and so must be tilted like the other polar sundials. A base design is not part of the model.
Because the longitude correction is included, a suitable position is to put one of the sides of the bottom square in the E-W direction and to tilt the sundial by the co latitude (90 - latitude ). Then the planes with the hour lines will be in the NE-SW and NW-SE celestial directions. In such a case, for example, the upper right edge will cast a shadow on the upper left plane from 6 to 9 hours LOCAL time and the left edge from 15 to 18 hours LOCAL time.
|