|
The
Sundial Primer created by Carl Sabanski |
|
|
The
Sundial Primer created by Carl Sabanski |
|
| The Sundial Primer Index |
|
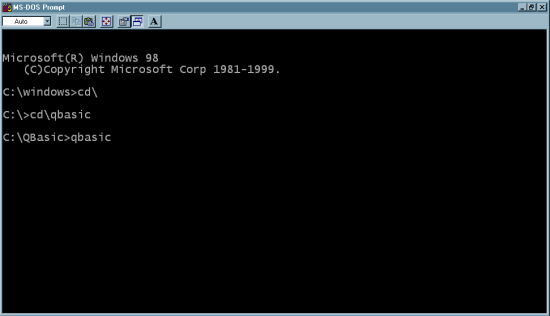
Dialling with QBASIC BASIC is an acronym for " Beginner's All-purpose Symbolic Instruction Code" and is a simple programming language for beginning programmers. QuickBasic is a programming language developed by Microsoft and released in 1985 to replace the earlier version GW-BASIC. It is ideal for beginners because of its intuitive commands, simple structure and flexibility. There are numerous web sites that support QuickBasic with tutorials, programs and literature references.QBASIC is a version that does not contain all the features available with QuickBasic. It was released in 1991 and came free with MS-DOS 5 and later versions. It also came with the Windows 95 and 98 operating systems. QBASIC is shareware but is limited in a number of ways. A couple of these is the limit on program size and that it cannot be used to produce executable files. Files written with QBASIC must be run using the program and have the "bas" file extension. A number of diallists as well as others have used QBASIC to write various dialling and other useful routines. Some of these will be presented in "Dialling with QBASIC". However, if you are not familiar with QBASIC or do not have the software that's where we will start first. First, if you do not have QBASIC you can get Version 1.1 by selecting the link below. It comes in a ZIP file and contains two files, the QBASIC program "Qbasic.exe" and the help file "Qbasic.hlp". I recommend that you create a directory "QBasic" in the root directory "C:" on your computer. You will find this will make it easier to retrieve files when you want to run them. Place the ZIP file there and extract the two files. QBASIC is a DOS program and to use it you must be able to access the DOS prompt. The DOS prompt will be found in slightly different places depending upon the version of Windows you have. First select "Start" then, "Programs or "All Programs" and "Accessories" if necessary. You are looking for the program icon for "MS-DOS Prompt" or "Command Prompt". Once you have found it click and a DOS window will open. In the newest versions of Windows it may not be possible to get the DOS prompt as these selections may not be available. Go on the internet and search for a program called "DOSBOX". It is free and when installed will provide a DOS window. Once you find the DOS prompt place it on the Desktop as a shortcut for easy access by right clicking of the program icon and then selecting "Send To" and finally "Desktop".. Figure 1 shows the screen that will appear when you select the DOS prompt command however it will only have "c:\windows" on the command line. Maximize the window using the button in the top right hand corner. If you use the "Full Screen" button the DOS window will fill the entire screen and you will not have access to the Desktop unless you exit DOS. NOTE: To get out of the DOS window type "exit" and press the "Enter" key...remember this.
Figure 1: DOS Prompt Window When working in the DOS window you must type all the commands you want the computer to make. It does not matter if upper or lower case letters are used. The first step is to get to the directory where the QBASIC program is located. If you placed it in the "QBasic" directory as suggested above type in the commands in Figure 1. Note the command "cd" is for "change directory" and the backslash "\" must be used. The command "qbasic" in the last line will initiate the program and the screen in Figure 2 will appear.
Figure 2: QBASIC Startup Screen Pressing the "Enter" key will bring up the "Survival Guide" with tips on using QBASIC "Help" file and pressing the "Esc" key will bring up the screen in Figure 3. Read the "Survival Guide" as it is very short. You can access the "Help" files from here or by selecting "Help" at the top right hand side of the screen. Any of the commands found in "File", "Edit", "View", "Search", "Run", "Debug", "Options" and "Help" can be initiated by selecting them and left clicking the mouse button. However, when in the "Survival Guide" and "Help" screens clicking the mouse will not work. Place the pointer under the item of interest and left-click. The flashing cursor will then be seen under the item. Press "Enter" and you will be taken to the "Help" item you want to read about.
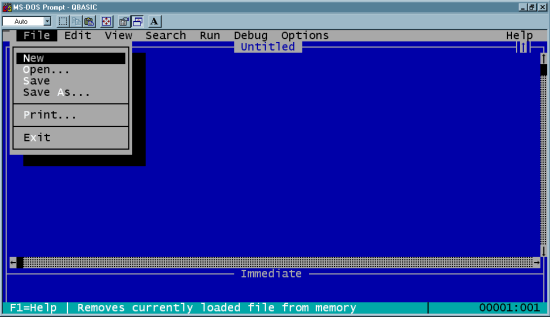
Figure 3: The QBASIC Screen If you want to leave and get back to the DOS prompt select "File" and '"Exit" as shown in Figure 4.
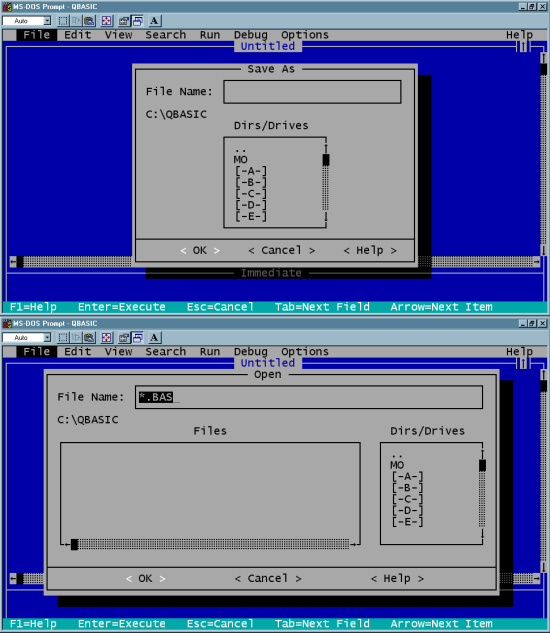
Figure 4: Exiting QBASIC When saving QBASIC programs first create sub-directories in the "Qbasic" directory. This will help to organize them and make them easily accessible. Figure 5 shows the screens displayed when File" and "Save As" or "Open" are selected. Any sub-directories in the directory where the QBASIC program resides are shown. In this case there is one called "MO" and it can be selected by clicking it to show the "bas" files it contains. Other drives can be selected but the remainder of the path and file name must be typed in. IMPORTANT: As this is a DOS program the file names should be limited to 8 characters or else the name will be truncated. This will create problems so do not use more than 8 characters. At times the screen may blank out momentarily. DO NOT worry as it will return to normal.
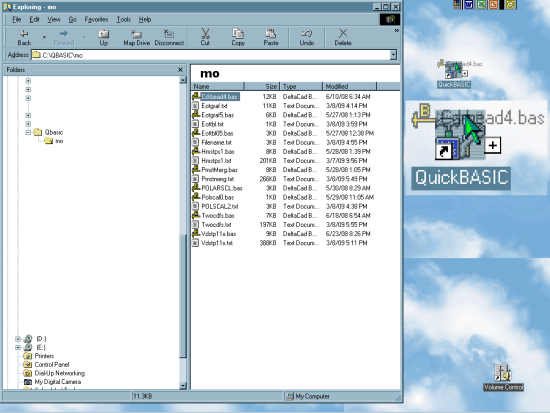
Figure 5: Organizing QBASIC Files Opening a file in QBASIC will display the file contents but does not run it automatically. Read the file carefully as there may be changes that need to be made to inputs so the file will be personalized and meet your particular needs. To get it to run select "Run" and then "Start" or press the "F5" key. Follow the instructions and the file will run and display the output on the entire screen. To return to the DOS window follow the directions on the screen or press the "Esc" key. The output is automatically saved as a text "txt" file usually in the root directory "C:" but read the QBASIC file to be sure. Move the file into the directory you are working from just to keep everything together and easier to locate. If you are uncomfortable with the prospect of working in DOS then look at Figure 6 for an easy way to start any QBASIC program. All you need to do is "drag and drop". First place a shortcut on the Desktop by right clicking of the "Qbasic.exe" file and then selecting "Send To" and finally "Desktop". Using "Explore" got to any directory where you have saved a QBASIC program with the "bas" extension. Right click and hold on the file you want to run. Drag the file on to the QBASIC (QuickBASIC) shortcut icon located on the Desktop. Figure 6 shows how the shortcut will look with the file dragged on to it. The shortcut has been magnified so it can be seen more clearly. Just release and QBASIC will appear with the program opened. Be certain the icon changes visually as shown before dropping the file or all you will do is move the file on to the Desktop. If this happens just "drag and drop" the file back into its directorey. You will still have to run it by selecting "Run" and then "Start" or press the "F5" key. You can also double click on the "QuickBASIC" shortcut at any time to start QBASIC.
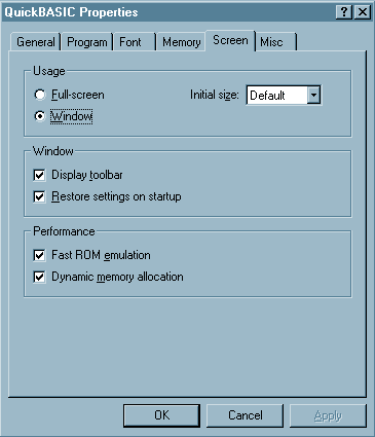
Figure 6: Starting QBASIC from Windows If you have a problem with the DOS window or QBASIC coming up in the full-screen mode all the time that can be corrected. Figure 7 shows how to do this with QBASIC but the procedure is the same for the DOS window. Right click on the Desktop shortcut or program file and select "Properties". Select the "Screen" tab and then select "Window" and finally "Apply". A QBASIC or the DOS window will now appear when either is selected to run. If the full-screen mode returns come back to this tab and check if it has gone back to "Full-screen" for some reason.
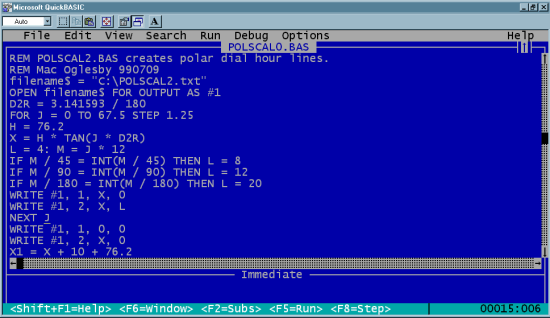
Figure 7: QBASIC Screen Size Figure 8 shows an example of a program opened in QBASIC. Only a portion of the program is visible. Note that the cursor is locate under the "J" in the fourth line from the bottom. In the bottom right hand corner are the numbers "00015:006". The "0015" is line number where the "J" is located and the "006" is the number of characters from the left where the "J" is located in the line. Knowing how to find a specific line number is important to know for subsequent QBASIC pages.
Figure 8: A Program Opened in QBASIC Programming in QBASIC is beyond the scope of these pages. Here you will find routines written in QBASIC and some explanation on what they are intended for and how to use them. There will also be instruction on how to convert the QBASIC output "txt" files into DXF files that can then be opened in CAD programs such as DeltaCad. In order to be able to do this you will require a conversion written by Fer de Vries. Fer has given permission to offer the program "CONVERT" here. Extract it from the following ZIP file. Place the file in the QBASIC directory. It can be run by typing "cnvxxxx" in the command line and the screen shown in Figure 9 will appear.
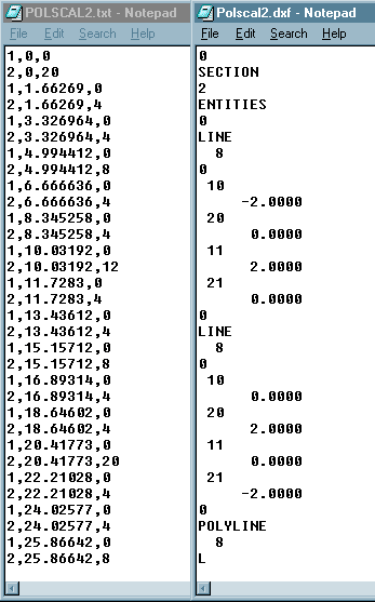
Figure 9: CONVERT - CNVXXXX.exe The path and file name to be converted to a DXF file must be typed in. The "txt" extension is not required. If the directions given above regarding the creation of directories is followed typing will be kept to a minimum as can be seen by the following example. c:\qbasic\"sub-directory"\"filename" The program will create a DXF file with the same name and in the directory where the QBASIC file is located. A second file with the extension "rlt" will also be created. This file can be opened in Fer's sundial design program ZW2000. Figure 10 shows an example of a text file written by the program shown in Figure 8 and the beginning of the DXF file that is created by using "CONVERT". For this small 3 kb text file a 13 kb DXF is created.
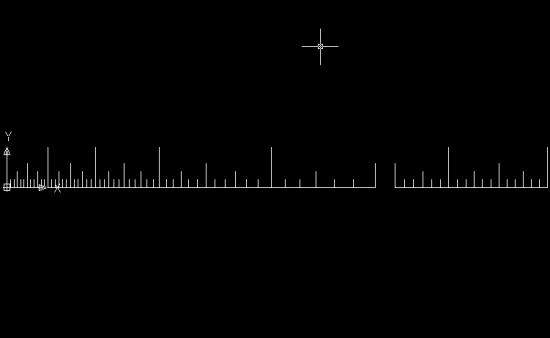
Figure 10: An Example of "CONVERT" When the DXF is opened using CAD software it will draw two horizontal lines and a number of vertical lines for a polar sundial. This is shown in Figure 11. The cross at the top is not part of the drawing but the cursor. The arrows showing the x and y axis are generated by the CAD software.
Figure 11: DXF File Opened in CAD Software If you are interested in writing QBASIC programs then you will want to learn how to format the text file so it can be converted to a DXF file using "CONVERT". Mac Oglesby has written a program called "TXT2DXF.bas" that creates a text file that will draw the Equation of Time. The output file is called "demoxx.txt" and is written to "c:\" as well as being displayed on the screen. You can place the file in another directory by modifying the path in line 68 of the program. The text file can be converted to a DXF file as described above and viewed in a CAD program. The QBASIC program as well as the text, DXF and "rlt" files are available here. As you can see, it is not difficult to use QBASIC programs and the results can be brought into a CAD drawing very quickly and with little difficulty. Check out what is available here and you may find something that is of use. And as an added bonus you can practice programming by modifying a program to meet your specific needs. Just remember to first save the file under a different name with a maximum of 8 characters just in case you need to start over. Mac Oglesby has done a lot of programming during his career and has provided a number of dialling related QBASIC routines. Others will be presented as they become available. If you have some QBASIC routines please send them if you would like them to be shared here with others.
|